![]() TM
TM
Fix Your Ford Web Site
Ford Explorer
(2000...1998-2000
typically, but also other years before and after)
![]()
![]()
![]()
![]()
![]()
![]()
![]()
![]()
NOTE DISCLAIMER: I will not accept liability for anyone's repair attempts. This information is posted for informational purposes only. Don't try this without proper training. Any repair attempts are at your own risk. It may not be the same problem that mine had. I will not be financially liable to any damage or expenses you may incur. This may void any type of warranty on your vehicle. Working on vehicle Airbag systems is dangerous and their is risk of serious injury and even death...repairs should be performed by trained professionals. These fix suggestions are not meant to put anyone's repair business out of business, etc,...
If you are like me, I have limited patience in having my automobile repairs done by the dealers. Typically, I have found that I will get charged $80 just to look at my vehicle and a minimum of another $200 for the most basic of service. I have also learned that the service managers that work at the dealers around here are paid on commission...it's in their best interest to charge you as much and to do as much service as they can get by with. It's in this state of mind that I have put together this web site.
What I am doing is documenting the fixes that I have been able to perform myself to keep my vehicle out of the dealer's repair shop. PLEASE NOTE MY DISCLAIMER ON LIABILITIES...By reading this, you accept responsibility for any repairs or tinkering you attempt.
Repair information is detailed with pictures along every step of the process. See an example of the type of detail in this instruction on the radio removal (click here)
The cost to access all of these repairs is $9.99 (the only one not included in this package is the repair information for the blank radio display....for that information please see www.FixYourRadio.com and the console repair kit is a separate package). If you find that the information provided does not help you fix your problem...it's a money back guarantee...just let me know.
NOTE - The repair instructions provided in the special access section are only those listed below (not necessarily the ones discussed in the posted messages)...if the repair is not listed below in the list, it's not covered by these special access instructions.
Click either icon below to make a PayPal contribution for access to the FixYourFord.com information.
$9.99 for Access for FixYourFord.com Solutions
![]()
If you would rather mail your contribution (check, money order, or cash) , click here for the details.
If you have a yahoo.com email address, make sure to check your spam folder...seems like yahoo.com likes to stick my emails in there.
Here's What People are Saying about FixYourFord.com...
This is now a classic...I first got this email on Tuesday morning...
"The vehicle is hard to start. It will start if you push
on the gas pedal, but then will die immediately when you let off the gas
(Idle Air Control)...a simple fix.
(Requires a 7mm & 8mm socket wrench, a screw driver, a clean rag, and a can
of Throttle Body Cleaner which can be purchased at any automotive center for
about $2)".
This is exactly what is happening to my 2000 Ford Explorer Sport...(just
discovered it today..) and for what ever it's worth... a $9.95 donation is
the least I could do.. Now all I need to know is what in the world I do with
the socket wrenches, screw driver and can of throttle body cleaner???...
(This will be a first for all the Manhattanites to see ... a girl working on
her truck!)
Thanks in advance...
Debbie Usvaltas - DUsvaltas@NOSPAMaol.com (remove NOSPAM for valid email
address)
New York City
By the afternoon (same day), I had received this follow-up report to the repair attempt...
Hi Duane...
Well for the grand total of $28.04...$9.95 for your support and $18.09 for
the sockets, ratchet, throttle body cleaner and some silicon to eliminate
any trumpet sounds just in case ... (thankfully no trumpets were heard nor
harmed in the making of this repair)... I am the once again happy owner of a
smooth idling Explorer! If women ever wanted to find a way to meet men...I
think they should work on their vehicles... I received a lot of compliments
doing the work... Plus doing the jumping for joy when I fired up the engine
didn't hurt either!...
I think the most expensive item I will have to pay for will be my
manicure... that Throttle cleaner takes off nail polish too did you know??
hmm do I see a commercial here??? (you really need to advertise more... you
could make a lot of money!)
For the ratchet, correct sized sockets, and cleaner - $18.09
For the step by step technical support - $9.95
For the post-manicure - $20.50
For the satisfaction of saving $200 and doing the job yourself...
PRICELESS!!!
Thank you so much!!! I will ALWAYS seek your site for help from now on!..it
felt so good to have the correct sized sockets, the correct tools needed and
the right pictures so you knew what to look for to do the job!!!
Much appreciated!
Debbie Usvaltas - DUsvaltas@NOSPAMaol.com (remove NOSPAM for valid email
address)
Manhattan, New Yorkk
Console Repair Kit Feedback. This is what it's all about...
Duane ..... our order was shipped promptly ... you responded via e-mail the same day we ordered. Package arrived quickly. Your web based instructions with photos were perfect ... also appreciated the "tips" from previous installers ....everything worked perfectly and saved approximately 50% over what I was quoted locally by an upholstery shop much less a new part by Ford!
Donald Koch - kochs@NOSPAMsbcglobal.net
Console Repair Kit Feedback...
Hi Duane,
The directions were very good. I followed them step by step and the
installation went perfect. The color matched perfect also. Thanks a lot for
having do-it-yourself repairs available. It saved me a lot of money and was
very easy to do.
Thanks again,
Tony Blackwell - tblackwell1@NOSPAMtriad.rr.com
More Console Repair Kit Feedback...
Hi Duane,
I wanted to THANK YOU so much for the Console Repair Kit. My husband fixed
my console and I am soooo happy!!! The written instructions were great but
the pictures were THE BEST!!!! My husband can fix ANYTHING but he thought
the picture guideline helped all go smoothly :)
Thanks again - I am no longer embarrassed to have people in my SUV and it
didn't cost me a fortune :))
Best regards,
Marti Meyer -
mjpepito@NOSPAMsbcglobal.net
Console Repair Kit Feedback...
I just installed the console repair kit and it work great! This was too
easy. You provide a great product with simple instructions.
THANKS!
Andrew Madans - amadans@NOSPAMcomcast.net
Jake takes advantage of two different programs, the Console Repair from this site, and the Save My Sanity Swap Program to fix your blank radio display from the www.FixYourRadio.com web site...
Duane:
It worked!!!!!!!!!!!!!!!!!!!!!!!!!!!!!!!!!!!
I got the center console fix today! And it went as expected! And it looks
great. My elbow now has a nice smooth surface to rest on!
And..............
I got the circuit board for the radio fix as part of the swap program! It
works!!! My radio display works!! I couldn't believe it! I was so happy to
see it light up 12:00!!! Thank you so much for your website and your swap
program. You should be seeing my old board in the mail soon, as I will mail
it tonight. Thank you again so much!! Now anytime I know a person with a
Ford Explorer I ask them is there display is broke, because I just love to
tell people about this really cool website I found where the guy walks you
through how to fix stuff! Anyway, thank you again!
Jake Schwietering -
jake.schwietering@NOSPAMcenterpointenergy.com
Here's how it all works for the Console Repair Kit....
I received the arm rest cover today. Since I had a chunk missing from my
console I couldn't wait to start on my new project. Using your excellent
directions I was able to complete the project in about an hour. Now it looks
so much like the original that only a trained professional can tell the
difference.
Thanks for the kit
Keith Vinson - vinniek@NOSPAMprodigy.net
This is what continues to make me smile...
Just wanted to let you know, that I received my arm-rest kit and well, IT'S
PERFECT!! It took me less than a hour, and I'm a perfectionist, to
completely cover my arm-rest and it looks great. I used the clear wide tape
and used a lot of it. I wanted to make sure the edges were as smooth as
possible. I replaced the back plate and trimmed the tape like was suggested
and VOILA!!!
I've had numerous compliments on it and yes, they were impressed that a 46
yr old female could do it well enough to meet her own standards....hee*
thanks again,
lynn~ tamilita@NOSPAMhotmail.com
Oh, how I wish I could reach people before they go
to the dealer or a mechanic. In this case, the wife saves the day....
I own a 2000 Explorer Eddie Bauer with a V-8. One
morning after buckling in my two children I went to start my car. It would
try to turn over but never did. I called a friend of mine who is a mechanic.
He planned to come to my house to check it out, but was having a hard time
working it in to his schedule. For two weeks the car sat in my garage. My
husband decided to tinker with it and I went to the internet. I typed in my
problem in the search engine and was directed to this site. Our problem
sounded alot like the IAC so we tried the fix and in about 15 minutes the
Explorer was running. It was worth every dollar we paid to you, Duane.
Thanks so much for creating this site,
Vicki and Barry Tomlin - tomlinbv@NOSPAMbellsouth.net
It's Nice to Hear the Feedback on the Console Kit and Repair Info...
M Bird Texas - mbird26@NOSPAMhotmail.com
Fort Worth, TXX
Feedback on Rear Brake Job...it's what this site is all about...
Duane,
The instructions were great! I haven't done any car work in years (save oil
changes) and your clarity inspired my to try the disk pad job ($200 savings
from shop quotes). The only thing that slowed my down was that the last
"professional" installation had mounted the pads backwards (single tabs
facing the wrong way). The pad mounting plates were even stamped with a
B(ack) and F(ront) on either end. It took a few minutes translating your
Figure 18 of the calipers into a mounting position and convincing myself
that I, a total novice was correct in identifying this problem (with your
help).
The $9.99 donation had a 2000% return in just one day!
Thanks,
Bob Wikse - bwikse@NOSPAMatt.net
- NOW AVAILABLE --
CONSOLE COVERING REPLACEMENT KITS!
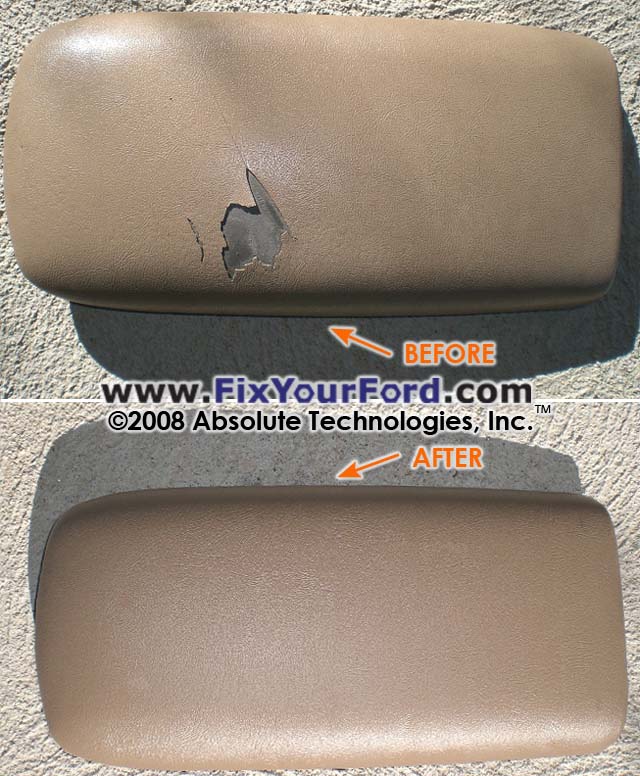
Figure 1 - Typical Console / Armrest
- Ford Explorer, Mountaineer, etc.
Before and After Replacement with Console Repair Kit
(remove NOSPAM for a valid email address)
Medium Prairie Tan Color Shown Above
Jeff Rutt's comments on his repair shown in Figure 1 above:
Done...Excellent instructions and
easy to complete. Less than 1 hour.
Included are a before and after pic.
~Jeff
See the details below - CLICK HERE!
- Special Electronics Section -
-
RADIO REPAIR - BLANK DISPLAY, VOLUME CONTROL, CD EJECT ERROR
See the Radio Repair details below -
CLICK HERE!
-
OVERHEAD CONSOLE TEMPERATURE / COMPASS READOUT - BLANK DISPLAY, NON-OPERATIONAL REPAIR
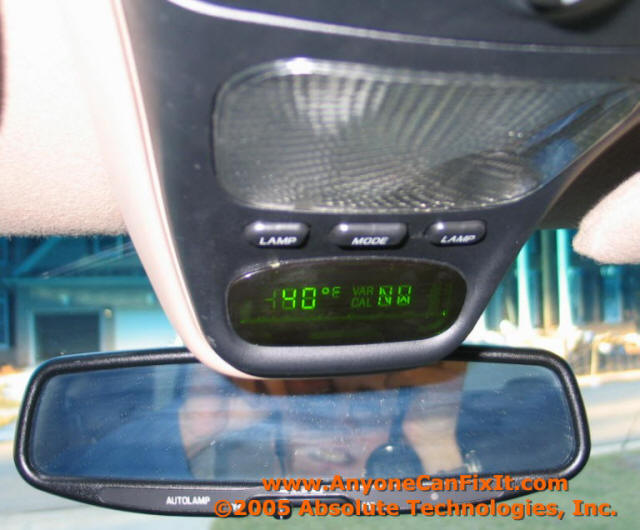
See the Overhead Console Repair details below - CLICK HERE!
PICK YOUR PROBLEM:
(Access to all solutions below can be gained by making your
payment of $9.99)
-
The vehicle is hard to start. It will start if you push on the gas pedal, but then will die immediately when you let off the gas (Idle Air Control problem). Basically, the vehicle will not idle...a simple fix (this repair performed by the Manhatten-ite, Debbie Usvaltas, in the email story above),
(Requires a 7mm & 8mm socket wrench, a screw driver, a clean rag, and a can of Throttle Body Cleaner which can be purchased at any automotive center for about $2).
Time For Repair:
Mechanically Inclined - 20 minutes
First Timer - 60 minutes
This is a low challenge...as easy as changing your wiper blades (maybe easier).
Cost to do it yourself (if you already have the tools): About $2 (+ $9.99 for these instructions)
Dealer Cost to Repair: Between $150-$450 plus towing costs (~$100)
I just recently had to do this for the second time at 151,XXX. It took a total of 15 minutes from start to finish. Anyone can do this in less time than it's going to take you to look up the number to the dealer and schedule an appointment. If the detailed, picture intensive instructions don't help you fix your problem, you're more than welcome to a refund of your payment. If you own one of these vehicles, you're going to have this problem sooner or later (and if you've already had it, you know what it cost to tow your vehicle and the charges of the dealer)...and there's no reason you can't do it yourself with just a should do this yourself with a 7mm & 8mm socket wrench, a screw driver, a clean rag, and a can of $2 Throttle Body Cleaner...easy task and no knuckles should be scrapped in the process.
-
If your gas pedal is sticking just ever so slightly so that when you first start pushing the accelerator, it's wanting to surge ahead...a simple fix.
(Requires a 7mm socket wrench, a screw driver, a clean rag, and a can of Throttle Body Cleaner which can be purchased as any automotive center for about $2).
Time For Repair:
Mechanically Inclined - 30 minutes
First Timer - 1 hour 20 minutes
This is a low/medium challenge...lots easier than sparkplugs, but a little harder than changing your wiper blades; just an additional step than the Idle Air Control Valve cleaning explained above (do both of them at the same time, using the same tools).
Cost to do it yourself (if you already have the tools): About $2 (+ $9.99 for these instructions)
Dealer Cost to Repair: Between $80-$350
-
Air Bag indicator is illuminated (this is common on vehicles with side impact air bags)...simple fix, but be careful.
(Requires a small screwdriver and tube of electrical conductive bulb grease which can be obtained for most any automotive stores).
-
One of the Door Ajar sensors is not working...door ajar warning light stays on.
(WD-40 Spray).
-
The rear wiper stops working
(No tools required).
There is a quick fix for this problem that sometimes work. If the quick fix doesn't fix it, you have the option of replacing the wiper motor.
Tips on changing the spark plugs.
(Typical tools for a spark plug change, plus, a car jack for the tip on
getting at the hard to reach plugs, patience, willingness to get scrapped
knuckles).
Blend Door Repair
(Required: Wrenches, drill, small nail, patience
and dexterity)..
Is your AC blowing hot air constantly, or is your heater blowing cold air
constantly...then your likely to have a problem with the mechanism that
diverts the air within your environmental control system.
Rear Brake Pad Replacement
Are you hearing a squeal from your rear wheels when you apply your brakes,
then you are likely ready to replace your rear brake pads. I did mine
the first time around 80K (that was a lot of highway driving...you may see
the need at 60K with more city driving). This instructions include
over 35 pictures and are better than what you'd find in a Haynes manual...in
my humble opinion. This is easier than changing spark plugs, yet many
people still go to a brake shop to have this done when it can be done at
home for a fraction of the cost and in about the same time it would take to
change the oil. The front brake pads are done basically the same way
(those instructions to be detailed soon).
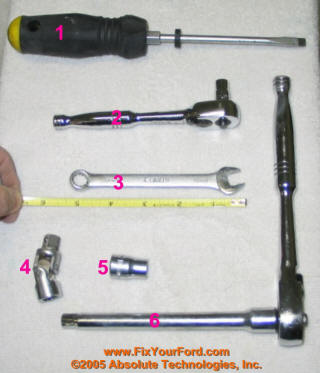
Tools Required for Rear Brake Pad Replacement
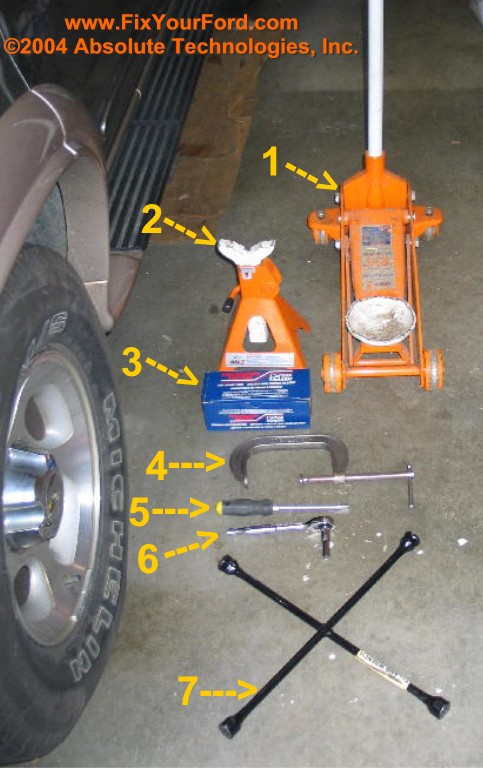
Figure 2 - Rear Brake Pad Replacement Supplies/Tools
1. Car Jack (you can use the one supplied with your car, but why not splurge
with the money you are going to be saving and add to your tool
collection...also, it comes in handy more times than you realize)
2. Jack Stand (for safety)
3. Rear Brake Pads (Premium, Heavy Duty preferred...more details in the
instructions)
4. C-Clamp (with at least a 6" opening)
5. Screw Driver
6. 10mm Wrench
7. Lug Nut Wrench (Tire Iron).
OPTIONAL
-Disc Brake Quiet (bluish glue to quiet any type of rattle from brakes pads)
-Torque Wrench (for tightening lug nuts to 100 ft-lbs)
Keypad Code - Locating the
Factory-Set Key Code /
Programming a new Personal Keypad Code
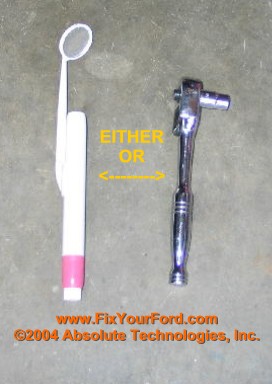
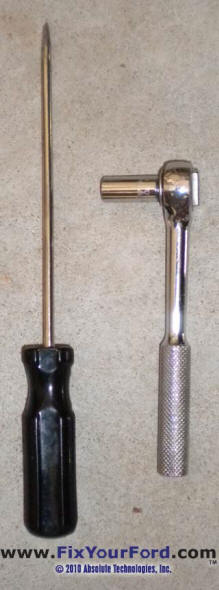
Figure 3 - Tools Required for Key Code Retrieval -
Either a Dental Mirror or a 7mm Wrench
Thermostat Replacement
If you are seeing your temperature gage go into the H (hot) Range and
causing the red "Look at Gages" light to illuminate, you may need a
new thermostat.
What I saw on my vehicle when I needed to replace the thermostat (has
happened twice now...first at 40,000 miles, then again at 140,000) I would
first notice that my vehicle was kind of bucking when starting from a
stop...as if the shifting wasn't working...it seemed to shift hard from 1st
to second gear. My first thought was my transmission is going out
$$$!!!! Luckily, once I started to watch my gages, I saw the
temperature would go into the H (thermostat stuck), then the vehicle would
act up and buck, then the temperature would finally drop back into the
normal range and everything was good.
The other time I had to replace the thermostat was during the summer months.
The car would seem to run funny (not smooth) and the air conditioner wasn't
working (this vehicle will shut down the AC if the engine is getting too
hot). This time I thought my AC compressor was going out $$$!!!!
Thankfully, again, just a $26 do it yourself thermostat job.
My other Ford, an 1988 Bronco II would go through thermostat about every
70,000 miles, however, it would fail by allowing the coolant to flow all the
time, which resulted in taking longer for the engine to heat up (thus, in
the winter, it took a long time to get warm air out of the heater).
This wasn't too bad on the engine. It seems on this 2000 Explorer of
mine, the thermostat wants to fail in the worse situation mode in which it
sticks and doesn't let coolant through to cool the engine....if you run your
engine too hot, too long, you can do severe damage to the engine...so watch
out.
Here's the tools I found necessary for this repair:
1. Screwdriver
2. Ratchet with 7mm socket
3. 10mm Wrench (about 5 inches long works best)
4. Swivel socket head (Universal Joint or U-Joint)
5. 10mm socket
6. 6 inch ratchet extension (Shown attached to ratchet).
Not shown but useful:
7. Rags for soaking up about 1 pint of antifreeze
Parts/Supplies:
1. Thermostat (costs about $15)
2. Thermostat gasket (costs about $2)
Not shown:
3. Antifreeze (to replace about 1 pint that will leak out during the repair)
I like to use the pre-diluted 50/50 Fast Fill (costs about $9
for a gallon)
Time For Repair:
Mechanically Inclined - 30 minutes
First Timer - 60 minutes
This is a medium challenge...lots easier than sparkplugs, but a
little harder than changing your wiper blades.
Cost to do it yourself (if you already have the tools): About
$26 (+ $9.99 for these instructions)
Dealer Cost to Repair: Between $150-$450
These instructions are for a 6 cylinder, Single Overhead Cam (SOHC) engine.
If you have another type of engine, your procedure may vary slightly.
The exact parts as purchased from Advance Auto Parts for the 6 cylinder,
Single Overhead Cam (SOHC) engine (if you don't have this engine, or not
sure, just ask the parts guy where you are buying your parts...they'll look
up the exact parts you need
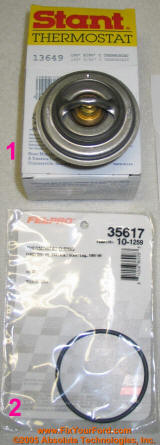
Thermostat
Part # 13649 $14.94
Thermostat Gasket Part # 35617
$1.98
New Prestone 50/50 Part # AF2100 $8.88
Belt (Serpentine Belt) Replacement
If
you are noticing that your belt is squealing or looking a little worn,
there's no reason for you not to replace this belt yourself. The
tools required are minimal, and it would actually likely take you more
time to schedule an appointment with the dealer than it would take to
actually do it yourself. Even if you don't have all the tools (you
may not have the drive wrench required), it would be cheaper to buy the
tool(s) and do it yourself than going to the dealer. The belt should
probably be replaced at least every 100,000 miles, and more likely about
every 60,000 miles to be conservative. If the belt breaks while
you're driving, you'll be stranded with a dead vehicle.
Tools needed for this repair:
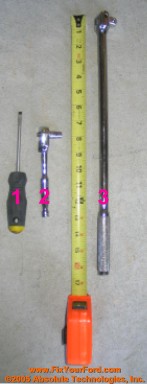
1. Screwdriver
2. Ratchet with 7mm socket
3. Flexible Ratchet with 3/8" socket.*
*I used one with a flexible ratchet with a 1/2" socket, as pictured above,
and used a 1/2" to 3/8" adapter. The tape measure, shows it to be
about 17" long. You should be able to buy something like this at the
auto parts store as you are buying your belt...should be less than $20.
I have seen a 1/2" socket flexible ratchet, 15" long, at Wal-Mart for
$14.83 plus you'd need to by the 1/2" to 3/8" adaptor for about $4.38.
Parts required:
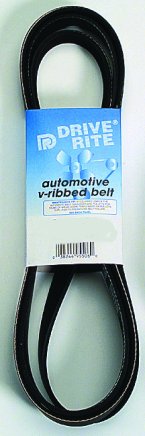
Serpentine Belt (Drive-Rite 27/32" X 86-.50" 6 Serpentine Belt Part
Number: 865K6)
This belt costs about $18.88 from Advanced Auto. They also have one
for as much as $35 with a year warranty (as opposed to a 90 day
warranty)...ask the auto parts store employee which one will work for your
particular car (make sure to get the proper belt for your size engine and
vehicle configuration).
Cost to do it yourself (if you already have the tools): About
$19 (+ $9.99 for these instructions) or about $40 if you need to buy the
long drive wrench
Dealer Cost to Replace: Between $70-$250 (I was personally
quoted $70)
Time For Repair:
Mechanically Inclined - 10 minutes
First Timer - 30 minutes
This is a low challenge...almost as easy as changing your wiper blades.
Good first timer type of job that you can pat yourself on the back for
completing and $aving money.
-
Intermittent A/C - A/C works for a bit then goes warm
If you are
having trouble where your air conditioning is cold at first, but then
after a few minutes, it will get stale, warm air blowing out, then this is
the fix for you. My ac would work fine on the highway, but in stop and go
traffic, the air would go warm...the times when the A/C was working, the
A/C air would be cold.
This repair is so easy that you will kick yourself for not figuring this
out sooner. It actually took me longer to document the repair in
this web site than it took to complete the repair. This problem
actually probably exists on many makes of Ford and Mercury vehicles...the
steps would be exactly the same and very easy to follow from these
instructions to perform in any other vehicle...even other makes and
models.
Tools needed for this repair:
TOOLS - Flathead Screwdriver and 5/16
Socket Wrench
No other parts are required!
Cost to do it yourself (if you already have the tools): About
$0!!!
Dealer Cost to Replace: Between $70-$2300 (If you
find an honest repair guy and he knows what the problem is, you may get
lucky with a $70 repair....more likely the repair guys will say that it
will take a "rebuild" of the A/C system at a cost of $2300.00)
Time For Repair:
Mechanically Inclined - 10 minutes
First Timer - 30 minutes
This is a low challenge...almost as easy as changing your wiper blades.
Good first timer type of job that you can pat yourself on the back for
completing and $aving money.
Your contribution for access to the FixYourFord.com solutions is used to keep information like this posted and up to date (...$9.99 is less than you were expecting to spend to get your vehicle fixed).
NOTE - The repair instructions provided in the special access section are only those listed above (not necessarily the ones discussed in the posted messages)...if the repair is not listed above, it's not covered by these special access instructions.
Click either icon below to make a PayPal contribution for access to the FixYourFord.com information.
$9.99 for Access for FixYourFord.com Solutions
![]()
If you would rather mail your contribution (check, money order, or cash) , click here for the details.
CONSOLE COVERING REPLACEMENT KIT!
For 1995-2000 (and maybe more) Fords
This Console repair kit will fit most:
Ford Explorers: 1995, 1996, 1997, 1998, 1999, 2000, 2001
Mercury Mountaineers: 1995, 1996, 1997, 1998, 1999, 2000, 2001
Explorer Sport Tracs: 2001, 2002, 2003
If your console looks like the one pictured in the pictures below, this would be the kit for you.
Is your console in need of repair? Has the console that serves as an armrest cracked and/or become worn? Has it cracked and faded from the sun. If it's like mine, it is used as a step for my 5 year old daughter to step on to get to the front door to let herself out before I can get around to let her out.
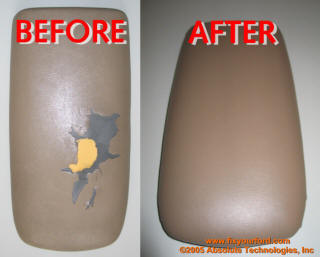
Figure 4 - Typical Console / Armrest
- Ford Explorer, Mountaineer, etc.
Before and After Replacement with Console Repair Kit
(Medium Prairie Tan Color Shown Above)
Here's what the customer of the above Prairie Tan Console had to say about our service on repairing these consoles (his console is actually pictured above in Figure 4...he sent his in for the $89.99 replacement...the do-it-yourself kit is the same product, you just install yourself for $24.99):
I shipped it to Duane on Saturday, he received it on Monday, he shipped it
back on Tuesday and I had it thursday. VERY quick turn around time. My
console looks good as new!!! I would recommend this process to anyone
because if you go to the dealership its about $300 and all they do is take a
console from an Explorer that was in the junkyard so you dont know how old
the leather is, it may crack in a matter of months, this way you get new
leather... Gonna last much longer and it is much cheaper.
Thanks again.
Ryan - ryanswed@NOSPAMyahoo.com (Remove the NOSPAM for a valid Email)
Phoenix, AZ

Figure 5 - Console / Armrest
- Before and After
(Willow Green Shown Above)
The console covering replacement kit includes the console covering and the instructions to replace the covering on the console (it's an easy task and the kit will have the appropriate color covering to make it look exactly like new...no need to go match the color of the covering with glue repair kits. These kits have a complete replacement covering to make your console lid new ...the detailed pictures and directions will show you how it will look and how easy it is to repair, step by step with plenty of pictures).
Here's the feedback I'm getting on these kits...
Skeptics Become My Biggest Fans...
Duane,
I must admit I was very skeptical about your ad on the internet about fixing
my 1995 Ford Explorer Console Lid! It sounded to easy and to good to be true
but for $24.95 I had to try it and if it was a internet scam oh well just
$25 down the tube and I have spent that 2 times over with Paint on Vinyl
from Auto Zone and you know how that looks! Your kit (Leather) came in the
mail just as you said in 3 days and the color matched perfect/ I was so
surprised and the biggest surprise was the instructions were perfect and a
total klutz like me did the job in about 30 minutes and it looks just like
NEW! My Eddie Bauer is perfect in everyway other than the tear the lid had
and now it looks GREAT! I just want to say thank you for your help and for
actually offering a product with easy instructions/ you can use me forever
as a reference and if you need a picture of my work let me know!
Danny Southerland - Katy, TX
danny.southerland@NOSPAMvelocityexp.com (remove
NOSPAM for a valid email address)
Another woman taking on the
console repair (and surprising her husband)...
I RECEIVED MY KIT TO FIX THE CONSOLE ON MY FORD
EXPLORER. IT WAS GREAT. I DIDN'T TELL MY HUSBAND -I JUST FIXED IT AND LET
HIM FIND IT. HE COULDN'T BELIEVE I DIDN'T GO OUT AND BUY A NEW COVER FROM
THE FORD STORE. I THOUGHT IT WAS THE EASIEST THING I HAD EVER TRIED TO DO. I
HAVE A FRIEND THAT WANTS ME TO ORDER IT FOR HER AND FIX HER CAR. THANKS FOR
MAKING IT TO EASY.
RACHAEL -
rgohagan@NOSPAMebanksc.com
Feedback on saving on the
console repair versus what the dealer wanted...
Thanks for sending my repair kit so promptly. I installed the replacement
and it looks great! The two protruding plastic posts were broken when I
removed my old cover. I tried gluing them back together with no luck.
However I discovered that they really weren't necessary and I reinstalled
the cover anyway.
My dealer wanted around $150 for a replacement cover. Needless to say, I'm
thrilled to have it fixed for so much less....Thanks!
Tommy Holt - tholt@NOSPAMsbcglobal.net
Austin, TX
Applaud to those women that get
tired of waiting on the "significant others" and do the repairs...the only
tool for the console repair is a philips screw driver and regular screw
driver...easy enough!
Thanks for such a wonderful product. It was soo easy. I
love that the shape was precut with the slits already in place. If I'd know
it was going to be this easy, I would have done it a lot sooner. My husband
is thrilled with the results!
Thanks Again
Marquette Williams
Some great feedback on the
Console Repair Kit (Brian gives some additional tips which appear within the
installation instructions)
Hi Duane -
First of all, I would strongly recommend your kit for replacing a
Ford Explorer console cover. For the price it can't be beat, and you make it
almost idiot-proof...
The illustrated directions you provided were near-perfect as well. The whole
process was simply unbeatable...
I really appreciate you having this available - mine looks (and looked)
exactly like the before and after pictures you have on your website - the
Willow Green one in figure 31.4. From a 32 year old bachelor who can barely
wrap his own Christmas gifts, this was pretty much a no-brainer.
Thanks!
Brian Heathman - HeathmanB2@NOSPAMaol.com
Dallas, TX
PAUL WILSON - P4Wls@NOSPAMaol.com
Cascade, VA
Console Kit works on a 2001 Explorer Sport...
Thanks for the repair kit. Worked great and it only took me about 40 minutes total. Totally changed the look of my car without having the huge rip on the console cover.
Thanks again,
Chris - pher16@NOSPAMcomcast.net
East Hartford, CT
Console Feedback...
Thank you so much! I found your instructions easy to understand and best of all easy to do!
The interior of my 1999 Explorer looks great now! This car needs to last forever for me! Only have 98500 miles and it’s paid for! Now my elbows won’t hurt after a trip!
Thanks so much again for coming up with such a simple solution to a relatively annoying problem!
Doris Berube - dorisftc@NOSPAMcolumbus.rr.com
Worthington OH
Always Good to Hear the Feedback...
Duane:
I just installed the pre-cut explorer armrest cover. It worked
perfectly! I couldn't find 1/4" staples that
fit my arrow stapler, so I just used the tape. It was easier than I
imagined! thanks for the great moneysaving product!
Dave Torma - Dearborn, MI
nakeddave2000@NOSPAMyahoo.com
Upon asking permission to use Dave's email above, here's his response...
Please do...I think it is absurd for the dealer to charge $150 for this
part. Keep up the good work!
Dave
Short and Concise Console Repair Feedback...
got my kit; installed it; looks good and saved me >$100
thanks
william rice - Tupelo, MS
willieri@NOSPAMaol.com
Console Repair Feedback...
Duane,
I received the much anticipated console repair kit today. I had two
tears about 1 1/2" long in my arm rest. I replaced it using the staple
gun method using 1/4" staples. I took before and after pictures. I will send
them along once developed. No digital camera here yet.
Thank you for your service. It was as easy as described. A new arm rest was priced at $120 + tax at a Ford dealer. Used parts only sell the entire console.
I saved $95 + tax using your service. My 97 explorers' arm rest now looks as good as new!
Cary Gambrell
Console Repair Feedback...
Hi Duane,
I received the console Repair Kit Friday and installed today (Saturday). It
looks fantastic the color and grain match is perfect.
Thanks for your easy to understand directions and pre-cut material.
Robert - Robzz31125@NOSPAMaol.com
Hewlett, NY
Console Repair Feedback...
DUANE, I RECV'D KIT TODAY AND HAD IT PUT ON IN ABOUT 90 MIN. YOUR INSTRUCTIONS WERE VERY CLEAR AND EASY TO FOLLOW. LOOKS FANTASTIC!!!!!!!!! THIS IS A GOOD DEAL FOR THE DO IT YOURSELFER AND IT DOES WHAT YOU SAID IT WOULD. THANKS (oneshotonek - ebay)
Ron Godfrey -
OLDGRANDDAD@nospamCOMCAST.NET
ELKRIDGE, MD
Console Repair Feedback...
The console kit worked
excellent. Thumbs UP!!!! Do you have a headliner kit available? Mine
is trashed.
Thanks,
Cleve - cjrandolph@NOSPAMworldnet.att.net
Covington, GA
The kit is $24.99, which includes shipping and handling in the continental US....shipping to other locations, please contact me. The kit includes everything you need to complete the job except for the additional tool requirement of only a philips head screw driver, a flat head screw driver, tape, and scissors (there is an optional method described in the instructions that requires a staple gun and 1/4" staples...but not necessary).
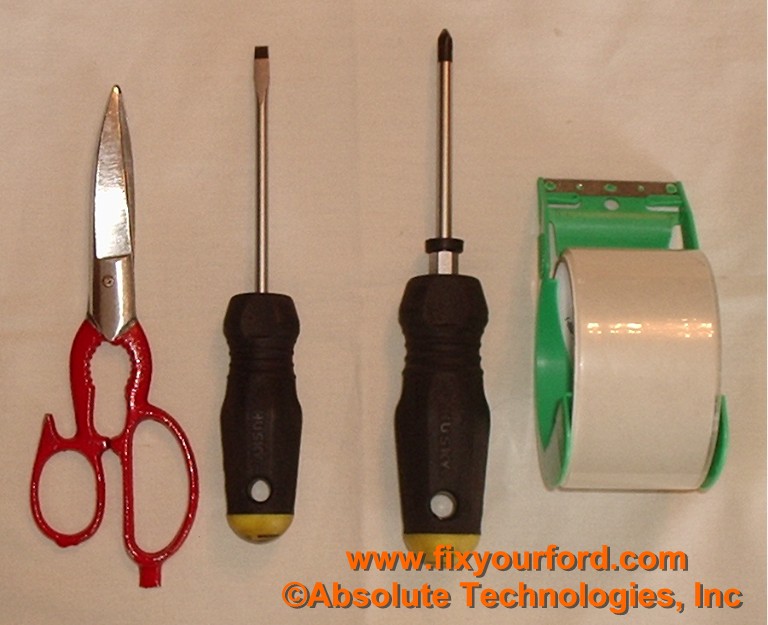
Figure 1 - Tools Required for Console / Armrest
Cover Replacement
Shipping typically gets your kit to you within 2-5 business days via US Postal Service).
This is not a patch repair, but a complete cover replacement.
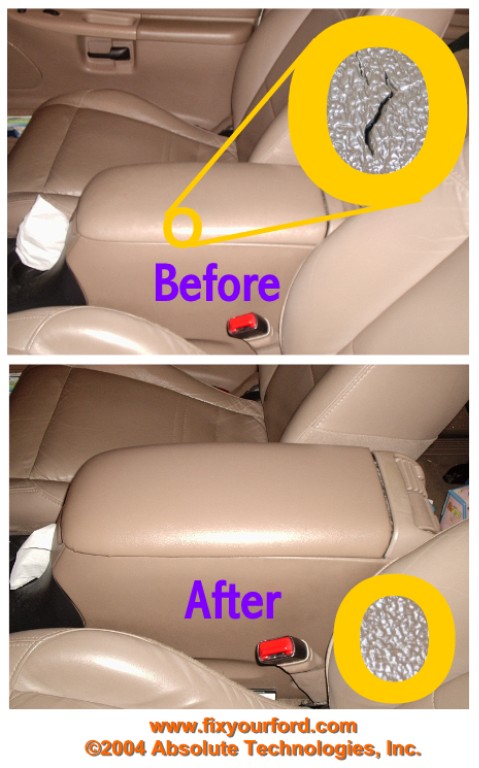
Figure 2 - Console / Armrest
Replacement Cover Kit in Ford
Explorer (Color - Prairie Tan)
Figure 2 above shows an actual replaced cover. I tend to be very picky about my vehicle and while my arm rest was just barely starting to show a rip, I was very eager to replace the entire cover and I didn't feel like the vinyl glue repair kits would satisfy me...plus the thought of mixing the paint colors to match just didn't appeal to me. With this kit, you get the complete covering to replace...no color matching necessary (except picking your appropriate color, example prairie tan). While my own console required the close up setting of the digital camera to appropriately capture the rip, I've seen plenty of these consoles in way worse shape (see Figure 2.1 below) especially those not garaged...mine is even garaged and the wear/rip occurred.
Figure 2.1 - Console / Armrest
- Before and After (Willow Green - Mark Huff)
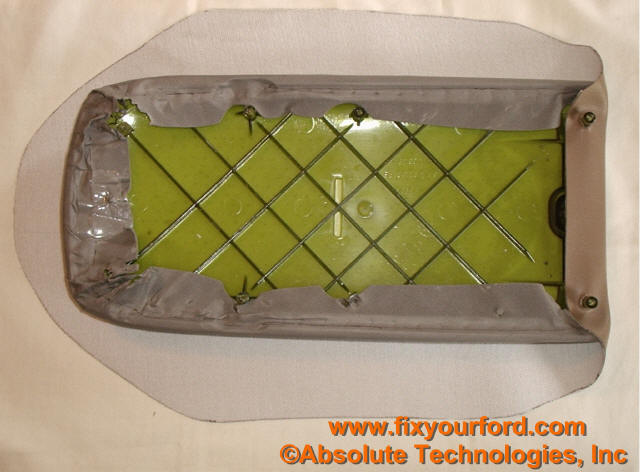
Figure 3 - Over 30 detailed pictures,
like the one above, with instructions detailing the step by step process of
the repair/replacement.
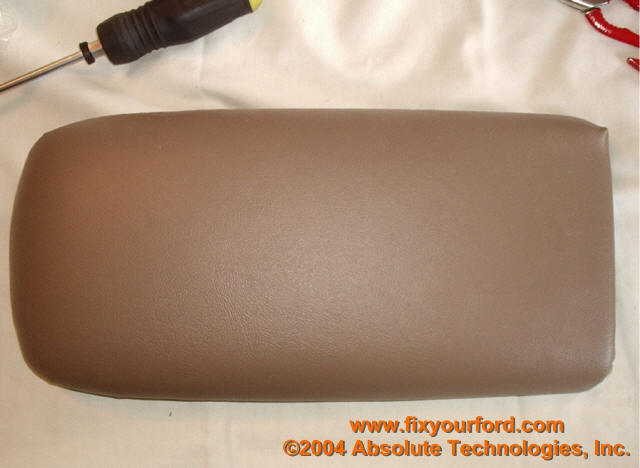
Figure 4 - Finished Results using the
Console / Armrest Replacement Cover Kit
You may use the label on the inside
driver door to verify and determine the color of the kit you need.
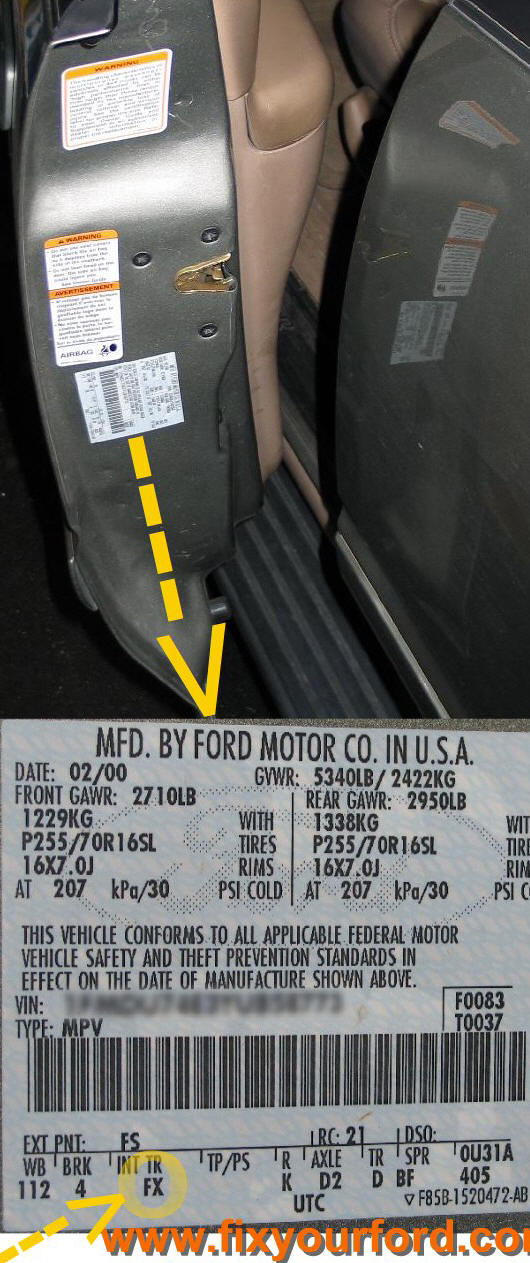
Figure 5 - Explorer Door Jamb Sticker
Decoder Information...
The first character as circled in figure 5 above is for the interior trim (in this case F indicates leather sport bucket seats...see Interior Trim code below).
The second character as circled in figure 5 above (and the one used to define the console color) is for the interior color code trim (in this case X for Medium Prairie Tan...see Interior Color Codes below).
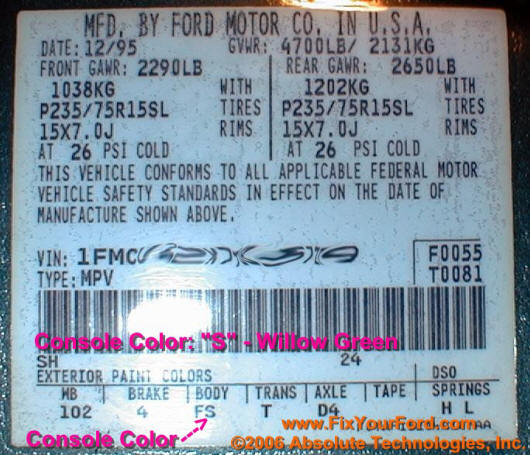
Figure 5.1 - Explorer Door Jamb Sticker
Decoder Information...
Figure 5.1 shows the door jam label for a 1995 Explorer. In this type of label, the color code is under the word BODY.
Interior Trim
A — vinybucket seats (Explorer)
J — cloth premium bucket seats (Explorer/Mountaineer)
Z — cloth sport bucket seats (Explorer/Mountaineer)
G — cloth sport bucket seats — less power (Explorer)
F — leather sport bucket seats (Explorer/Mountaineer)
M — cloth split bench seat (Explorer)
1 — limited leather sport bucket seats (Explorer)
Interior Color Codes
X — Medium Prairie Tan (F-150, F-250, Explorer/Mountaineer, Ranger)
2 — Medium Graphite (Econoline, F-150, F-250,
Explorer/Mountaineer, Ranger)
S — Willow Green (F-150, F-250, Explorer/Mountaineer, Ranger)
T — Dark Graphite (F-150, F-250, Explorer/Mountaineer, Ranger)
4 — Saddle (Explorer 1995, 1996)
E — Dark Denim Blue (Explorer/Mountaineer, Ranger)
To order your Console Repair Kit, you may submit your payment via PayPal:
PAYPAL USERS NOTE: Microsoft's Outlook Express is sometimes set not to allow viewing of attachments due to security issues (this may have been set automatically without your knowledge by Microsoft). If you are unable to read the attachment that is automatically sent to you once you donate via PayPal (or you do not see an email reply with a username and login within 10 minutes), try this: In Outlook Express click Tools, Options, Security and uncheck the box by "Do not allow attachments to be saved or opened that could potentially be a virus". This should allow you to see the email that was sent to you that has the attachment with your username and password. You may re-enable this once you have the chance to get your login and password from the email attachment that is sent.
CLICK BELOW FOR MEDIUM PRAIRIE TAN KIT

$24.99 Console Covering Replacement Kit
- MEDIUM PRAIRIE TAN
(Additional shipping charges may apply if
shipment is outside of the US...please contact
dharrison@fixyourford.com for exact charges outside of US)
CLICK BELOW FOR MEDIUM GRAPHITE KIT

$24.99 Console Covering Replacement Kit
- MEDIUM GRAPHITE
(Additional shipping charges may apply if
shipment is outside of the US...please contact
dharrison@fixyourford.com for exact charges outside of US)
CLICK BELOW FOR WILLOW GREEN KIT

$24.99 Console Covering Replacement Kit
-
WILLOW GREEN
(Additional shipping charges may apply if
shipment is outside of the US...please contact
dharrison@fixyourford.com for exact charges outside of US)
CLICK BELOW FOR DARK GRAPHITE KIT
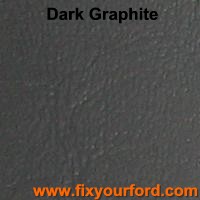
$24.99 Console Covering Replacement Kit
-
DARK GRAPHITE
(Additional shipping charges may apply if
shipment is outside of the US...please contact
dharrison@fixyourford.com for exact charges outside of US)
CLICK BELOW FOR SADDLE ('95, '96...) KIT
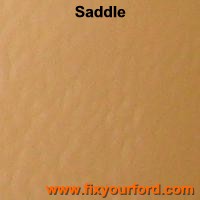
$24.99 Console Covering Replacement Kit
-
SADDLE ('95, '96...)
(Additional shipping charges may apply if
shipment is outside of the US...please contact
dharrison@fixyourford.com for exact charges outside of US)
CLICK BELOW FOR DENIM BLUE KIT

$24.99 Console Covering Replacement Kit
-
DENIM BLUE
(Additional shipping charges may apply if shipment is
outside of the US...please contact
dharrison@fixyourford.com for exact charges outside of US)
If you would like a sample of the covering for the color of your particular console, you may send a stamped, self-addressed envelope with 1) your color requested (refer to the codes above), and 2) your email address, to:
Absolute Technologies, Inc.
Attn: Console Sample Request
PO Box 601
Holly Springs, NC 27540
A small sample (about 1" x 1") of the console covering will be sent to you to verify the match with your console.
NOTE: MAKE SURE YOUR
EMAIL IS CURRENT AND CORRECT IN PAYPAL TO AVOID DELAY ON DELIVERY OF YOUR
LOGIN AND PASSWORD. IF YOU DO NOT RECEIVE AN EMAIL
WITHIN 15 MINUTES OF SUBMISSION OF YOUR PAYMENT TO PAYPAL, THEN SEND ME AN
EMAIL (dharrison@fixyourford.com) If you realize
that it was not current when you confirmed your PayPal contribution, please
send me an email (dharrison@fixyourford.com)
NOTE: Microsoft's Outlook Express
is sometimes set not to allow viewing of attachments due to security issues
(this may have been set automatically without your knowledge by Microsoft).
If you are unable to read the attachment that is automatically sent to you
once you donate via PayPal (or you do not see an email reply within 10
minutes), try this: In Outlook Express
click Tools, Options,
Security and uncheck the
box by "Do not allow attachments to be saved or opened that could
potentially be a virus". You may re-enable this
once you have the chance to get your login and password from the email
attachment that is sent.![]()
A login and password will be immediately sent to the email address that
is registered with your PayPal account. If this is not the proper email
address you want the login and password sent to, please send a note with the
proper email address, however, there will be a delay as the email will have
to be manually processed. If you want to avoid any delay, make sure your
PayPal email address is correct.
Or, you may mail your Check or Money Order for $24.99 to:
Absolute Technologies, Inc.
P.O. Box 601
Holly Springs, NC 27540
Please include an email address (if you have one), your shipping address, and the color of the console repair kit you need (Additional shipping charges may apply if shipment is outside of the US...please contact dharrison@fixyourford.com for exact charges outside of US)
Satisfaction Guaranteed...if you are not satisfied, please contact me for a complete refund (requires the return of your kit within 30 days). Even if after you have made your purchase, and you do not feel comfortable doing the repair upon reviewing the repair instructions, just let me know...I'll refund your money).
If upon reviewing the instructions, you do not feel capable of doing the repair yourself (it really is easy), you can arrange to send in your console for the repair for a cost of $89.99 (you're $24.99 can be applied to the cost...Additional shipping charges may apply if shipment is outside of the US...please contact dharrison@fixyourford.com for exact charges outside of US). Just contact me if you want to go this route. You would need to remove your console top (as shown in figure 6 below).
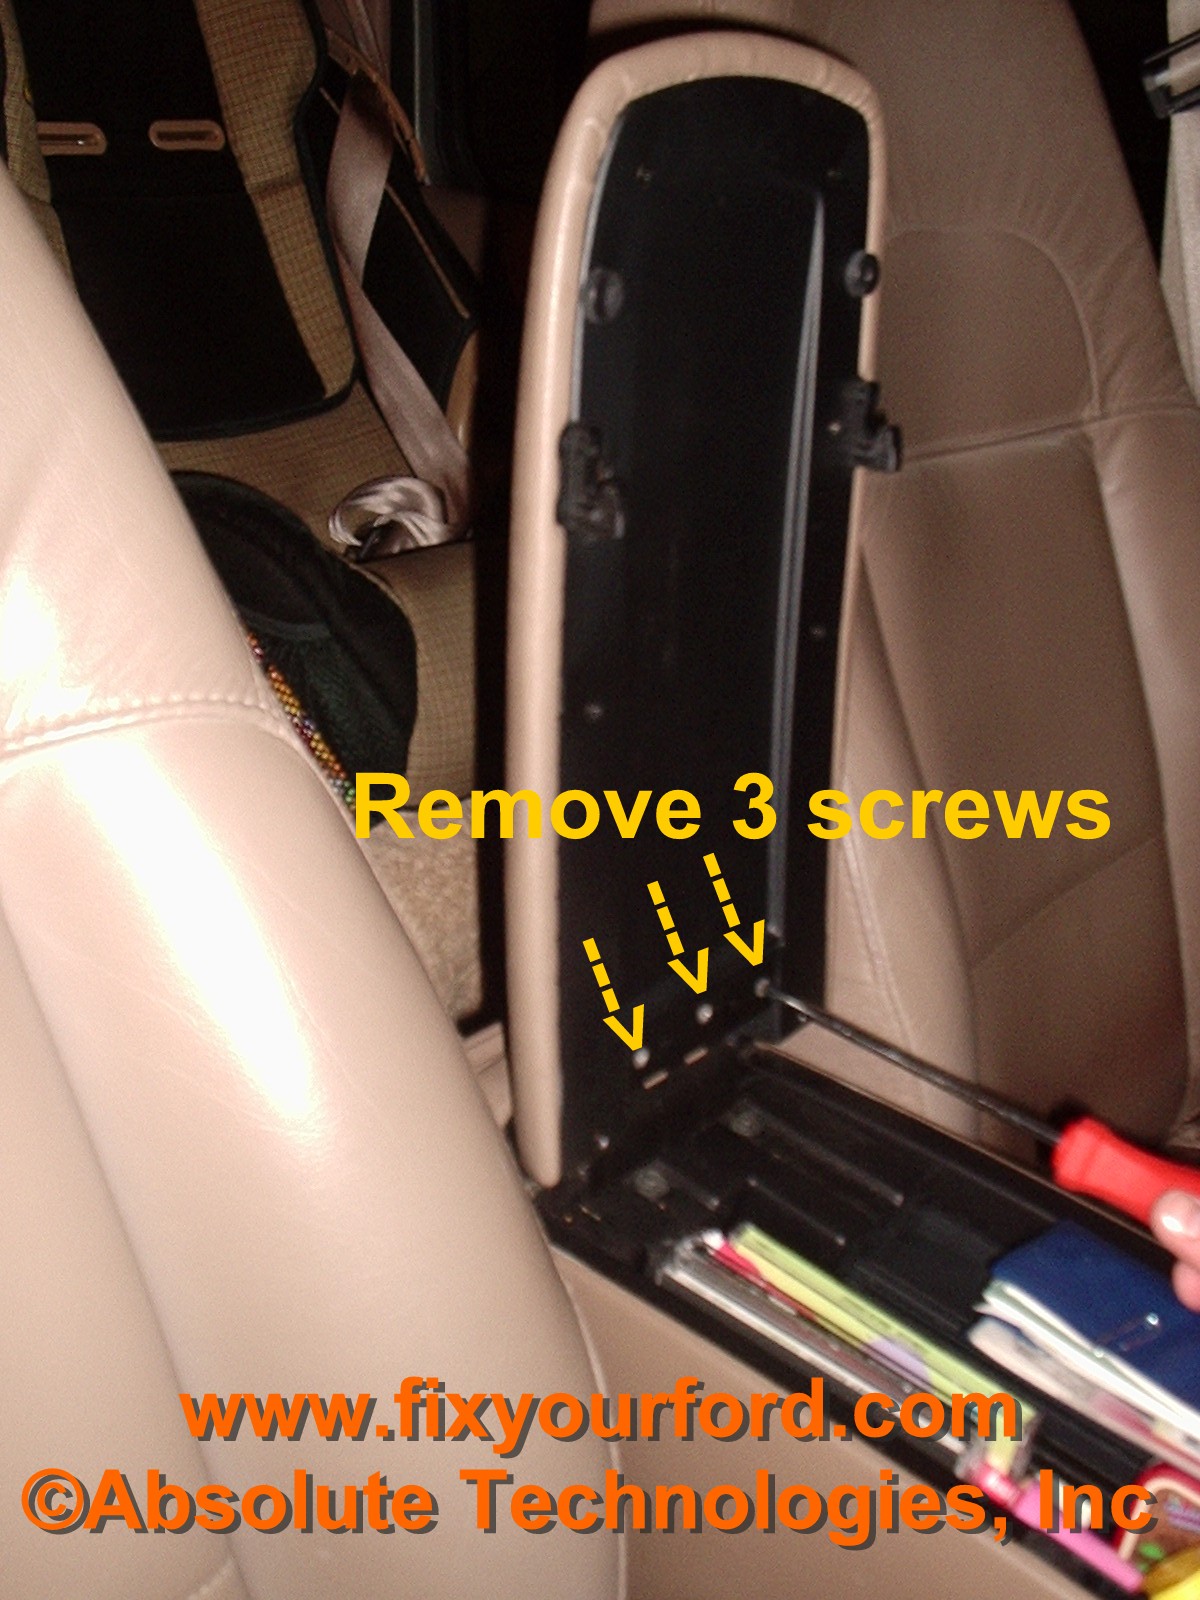
Figure 6 - If you want to ship the
console top in for the repair (if you are not up for doing the repair
yourself), you must remove the console top to ship in for the repair.
Remove the 3 screws as shown above (and hold on to the screws). Ship
your console with payment of $89.99 to:
Absolute Technologies, Inc.
PO Box 601
Holly Springs, NC 27540
If you would rather use PayPal for payment, I can send you a invoice from PayPal upon repair of your console.
I will add information as I run into situations that I
must address on my own vehicle, 2000 Ford Explorer equipped as follows:
- Wagon Eddie Bauer 4-Dr Year 2000
- 4.0L SOHC V6 210HP
- Spruce Green
- 4WD
- Front Side Airbags
- Heated Front Seats
- Power Moonroof with Shade
- Trailer Towing Prep Package
- Reverse Sensing System
- Skid Plates
- Radio Ford MACH Audio System
- 6 Disc CD Changer
- Leather Sport Bucket Seats
Our vehicle has typically been used in sales, so it has a lot of miles. I can only assume that repairs that we run into will be typical to anyone else having one of these vehicles, though, they may not be experienced as soon as we see it.
Click on the brief descriptions below to take you to information regarding the problem described.
If you have your own stories, please submit them. I will look at compiling them into this web site. Your feedback is encouraged and appreciated...please f eel free to leave a comment.
Regards,
Duane Harrison
dharrison@fixyourford.com
(this is not a part of the FixYourFord.com repairs)
Radio Repair - Blank Display or CD Eject Error or Volume Control

For access to this special information, please see www.fixyourradio.com.
Special
AnyoneCanFixIt Web Site:
(this is not a part of the FixYourFord.com repairs)
Temperature / Compass Overhead
Console Readout - Blank Display or Non-Operational
For the repair of this overhead
temperature / compass readout, instructions are available at the new web
site www.AnyoneCanFixIt.com.
Specifically, you can go to this link:
http://www.anyonecanfixit.com/auto.htm. These instructions for
electronics are not a part of the FixYourFord.com solutions available from
this web site.
What they are saying about the overhead console repair:
Duane,
Once again I found myself with a problem on my 1999 Explorer. (The
compass/ext. temperature readout went black.)
Having previously used your fix for my radio (see www.FixYourRadio.com);
I immediately got on your site, purchased the compass readout fix and once
again, within 30 minutes I was back up and running.
I can’t say enough how much I appreciate your repair helps, they have aided
in my enjoyment of my truck and are so easy; even a GIRL can do them…(just a
joke for all those guys out there who think women can’t repair anything).
Not only do I repair them, I enjoy repairing them with your complete
explanations and photos.
My husband wants me to trade the Explorer in for something newer with less
“problems”, I want to spend the $ on my motorcycle; especially since I have
the “FIXES” at my fingertips.
Thanks again and keep up the great service; I will be on the lookout for the
next FIX…Idle Air Control possibly.
Danielle Tuckier - snd13@NOSPAMsbcglobal.net (remove NOSPAM for a
valid email)
1999 Ford Explorer owner
Ford Explorer / Mercury Mountaineer Door Lock Repair
(this is not a part of the FixYourFord.com repairs)
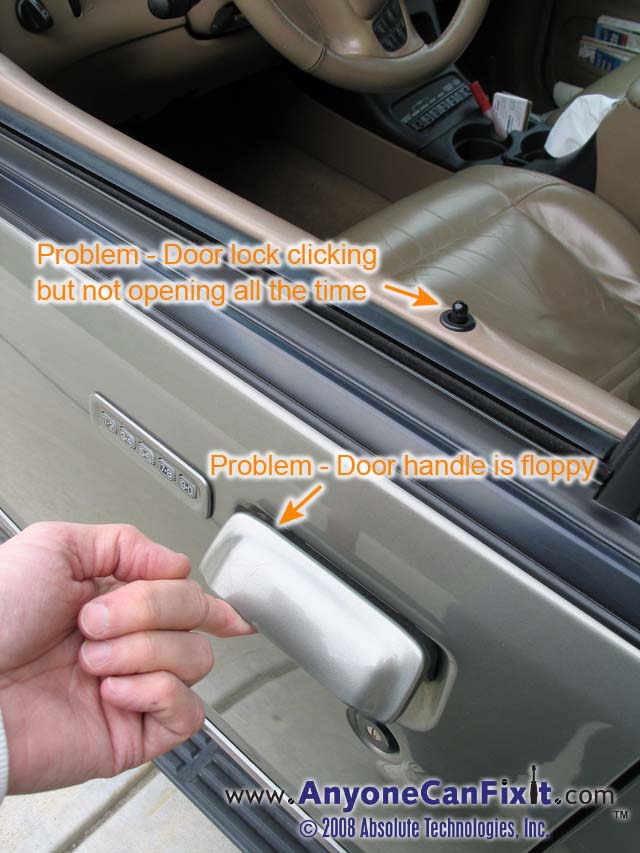
Figure 10 - The Problematic Door Lock
PROBLEM:
The door lock of your 1997-2001 Ford Explorer or Mercury Mountaineer is not
operating properly (might work on other years and models too). If your
lock makes a clunking noise, however, it will
not open the lock all the way (NOTE: If it doesn't make a clunking noise
from the remote, then you could have another problem not covered in these
directions...the door lock must be making an attempt to unlock and you can hear
it clicking when trying to open the door). This usually starts happening
occasionally, then it begins doing it all the time in which you cannot use your
remote to unlock your door. You will usually see the lock try to pop up
when operating the unlock of your remote, however, it just won't come all the
way up to unlock.
Sometimes, you will might also have a problem where the door handle has become "floppy". It has no tension holding it down in place. This door lock repair will actually fix this problem too (though, you don't have to have a floppy door handle problem to have the problem with the door lock).
THIS REPAIR IS *NOT* FOR A STUCK REAR DOOR THAT
WON'T OPEN...I have not addressed that issue...yet.
TIME & SKILL REQUIRED:
About a 20 minute job....give yourself another 20 minutes if you are taking your
time through the process. If you can turn a screw driver, you should be
able to complete this repair...there is some requirement to pop the door panel
fasteners off, but other than that, anyone should be able to easily complete
this repair with no mechanical knowledge or background.
TOOLS:
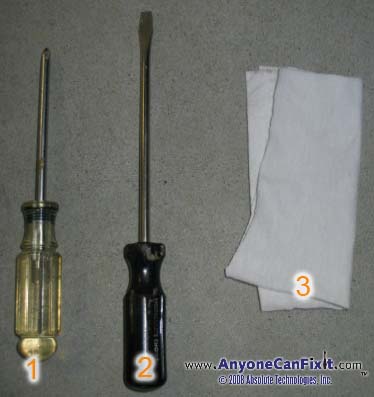
Figure 11 - The Problematic Door Lock Tools Required
1. Phillips screwdriver
2. Flat blade screwdriver
3. Scrap cloth
These instructions include an 8 minute video that shows you the entire process...yes, it can be done in 8 minutes...but give yourself some extra time.
For no additional charge, with your purchase of these instructions, you will be sent a part to complete the repair. The part will be mailed to the shipping address supplied on your payment of these instructions. It typically takes 3-5 business days to arrive via First Class US Postal Service. The part is key to completing your repair in 8 minutes as shown in the video
What People are Saying Regarding this Ford Door Lock
Repair:
Holy smokes ... If I didn't do it myself, then I
wouldn't have believed it. The thing that took me the longest was actually
getting the door open so that I could take the panel off in the first
place....Thanks again! I also replaced the console cover (see
www.FixYourFord.com) -- my wife was looking at me sideways as I had the
cover on the table, and then I showed it to her after I was done.
To get these Ford Door Lock Repair Instructions, submit $23.99 via PayPal using the icon below and you'll get a unique username and password to access these instructions.
$23.99 for these Repair Instructions on the Door Lock Repair which includes One Part Needed for the Repair
If you need to repair two door locks, you may obtain one additional part for the other door for an additional $5 shipping/handling fee. This may be purchased by paying $28.99 for the the two lock repair kit. To get the kit for two repairs, submit $28.99 via PayPal using the icon below
$28.99 for these Repair Instructions on the Door Lock Repair which includes Two Parts Needed for Two Repairs
NOTE:
Your login and password will be immediately sent to the email address that is
registered with your PayPal account. If this is not the proper email address
you want the login and password sent to, please send a note with the proper
email address, however, there will be a delay as the email will have to be
manually processed. If you want to avoid any delay, make sure your PayPal
email address is correct.
MAKE SURE YOUR EMAIL IS CURRENT AND CORRECT IN PAYPAL TO AVOID DELAY ON DELIVERY OF YOUR LOGIN AND PASSWORD.
If you realize that it was not current when you
confirmed your PayPal contribution, please send me an
email (dharrison@AnyoneCanFixIt.com)
Or, if you don't use PayPal, then your payment can be sent to:
Absolute Technologies, Inc.
Attention:
Ford Door Lock Repair
PO Box 601
Holly Springs, NC 27540
Please include your email address so that your access can be emailed to you.
Link for Access
If you have already paid for your access, here is the link to access the repair instructions (you must have the username and password that was set up for you...you should have gotten this in an email upon receipt of payment):
ALL CONTENTS ON THIS SITE ARE PROTECTED BY COPYRIGHT. EXCEPT AS SPECIFICALLY PERMITTED HEREIN, NO PORTION OF THE INFORMATION ON THIS WEB SITE MAY BE REPRODUCED IN ANY FORM, OR BY ANY MEANS, WITHOUT PRIOR WRITTEN PERMISSION FROM D. HARRISON. VISITORS OR USERS ARE NOT PERMITTED TO MODIFY, DISTRIBUTE, PUBLISH, TRANSMIT OR CREATE DERIVATIVE WORKS OF ANY MATERIAL FOUND ON THIS WEB SITE FOR ANY PUBLIC OR COMMERCIAL PURPOSE.
Home Page|Mail Payment|Repairs|Console Repair|Post a Comment|Disclaimer